Staining Microscopic Specimens
By the end of this section, you will be able to:
- Differentiate between simple and differential stains
- Describe the unique features of commonly used stains
- Explain the procedures and name clinical applications for Gram, endospore, acid-fast, negative capsule, and flagella staining
In their natural state, most of the cells and microorganisms that we observe under the microscope lack color and contrast. This makes it difficult, if not impossible, to detect important cellular structures and their distinguishing characteristics without artificially treating specimens. We have already alluded to certain techniques involving stains and fluorescent dyes, and in this section we will discuss specific techniques for sample preparation in greater detail. Indeed, numerous methods have been developed to identify specific microbes, cellular structures, DNA sequences, or indicators of infection in tissue samples, under the microscope. Here, we will focus on the most clinically relevant techniques.
Preparing Specimens for Light Microscopy
In clinical settings, light microscopes are the most commonly used microscopes. There are two basic types of preparation used to view specimens with a light microscope: wet mounts and fixed specimens.
The simplest type of preparation is the wet mount, in which the specimen is placed on the slide in a drop of liquid. Some specimens, such as a drop of urine, are already in a liquid form and can be deposited on the slide using a dropper. Solid specimens, such as a skin scraping, can be placed on the slide before adding a drop of liquid to prepare the wet mount. Sometimes the liquid used is simply water, but often stains are added to enhance contrast. Once the liquid has been added to the slide, a coverslip is placed on top and the specimen is ready for examination under the microscope.
The second method of preparing specimens for light microscopy is fixation. The “fixing” of a sample refers to the process of attaching cells to a slide. Fixation is often achieved either by heating (heat fixing) or chemically treating the specimen. In addition to attaching the specimen to the slide, fixation also kills microorganisms in the specimen, stopping their movement and metabolism while preserving the integrity of their cellular components for observation.
To heat-fix a sample, a thin layer of the specimen is spread on the slide (called a smear), and the slide is then briefly heated over a heat source (shown below). Chemical fixatives are often preferable to heat for tissue specimens. Chemical agents such as acetic acid, ethanol, methanol, formaldehyde (formalin), and glutaraldehyde can denature proteins, stop biochemical reactions, and stabilize cell structures in tissue samples.
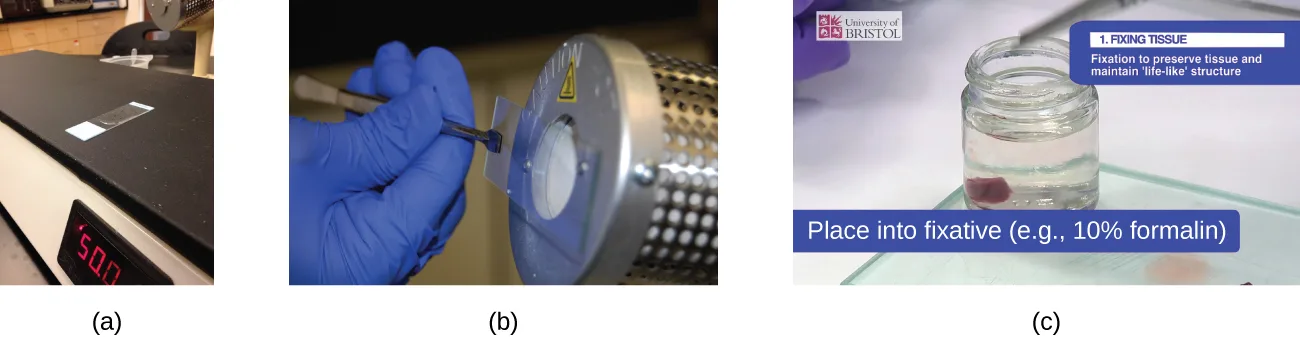
In addition to fixation, staining is almost always applied to color certain features of a specimen before examining it under a light microscope. Stains, or dyes, contain salts made up of a positive ion and a negative ion. Depending on the type of dye, the positive or the negative ion may be the chromophore (the colored ion); the other, uncolored ion is called the counterion. If the chromophore is the positively charged ion, the stain is classified as a basic dye; if the negative ion is the chromophore, the stain is considered an acidic dye.
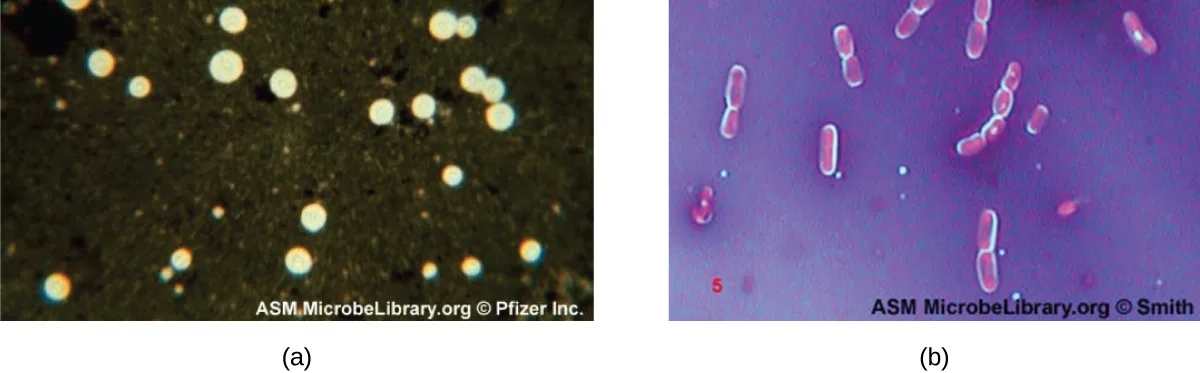
Dyes are selected for staining based on the chemical properties of the dye and the specimen being observed, which determine how the dye will interact with the specimen. In most cases, it is preferable to use a positive stain, a dye that will be absorbed by the cells or organisms being observed, adding color to objects of interest to make them stand out against the background. However, there are scenarios in which it is advantageous to use a negative stain, which is absorbed by the background but not by the cells or organisms in the specimen. Negative staining produces an outline or silhouette of the organisms against a colorful background (shown below).
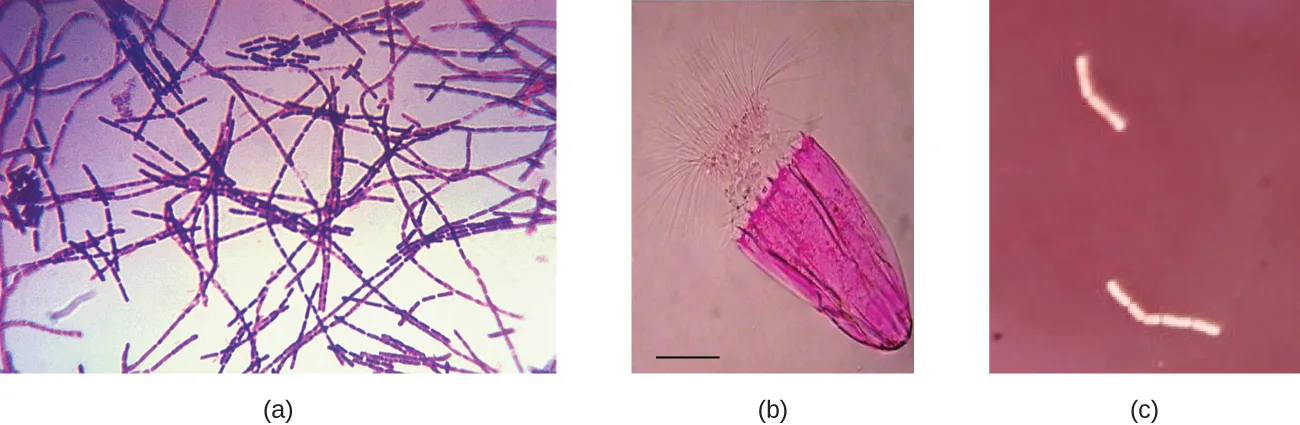
Because cells typically have negatively charged cell walls, the positive chromophores in basic dyes tend to stick to the cell walls, making them positive stains. Thus, commonly used basic dyes such as basic fuchsin, crystal violet, malachite green, methylene blue, and safranin typically serve as positive stains. On the other hand, the negatively charged chromophores in acidic dyes are repelled by negatively charged cell walls, making them negative stains. Commonly used acidic dyes include acid fuchsin, eosin, and rose bengal. The table below provides more detail.
Simple stains
| Stain type | Specific dyes | Purpose | Outcome |
|---|---|---|---|
| Basic stains | Methylene blue, crystal violet, malachite green, basic fuchsin, carbolfuchsin, safranin | Stain negatively charged molecules and structures, such as nucleic acids and proteins | Positive stain |
| Acidic stains | Eosin, acid fuchsin, rose bengal, Congo red | Stain positively charged molecules and structures, such as proteins | Can be either a positive or negative stain, depending on the cell’s chemistry |
| Negative stains | India ink, nigrosin | Stains background, not specimen | Dark background with light specimen |
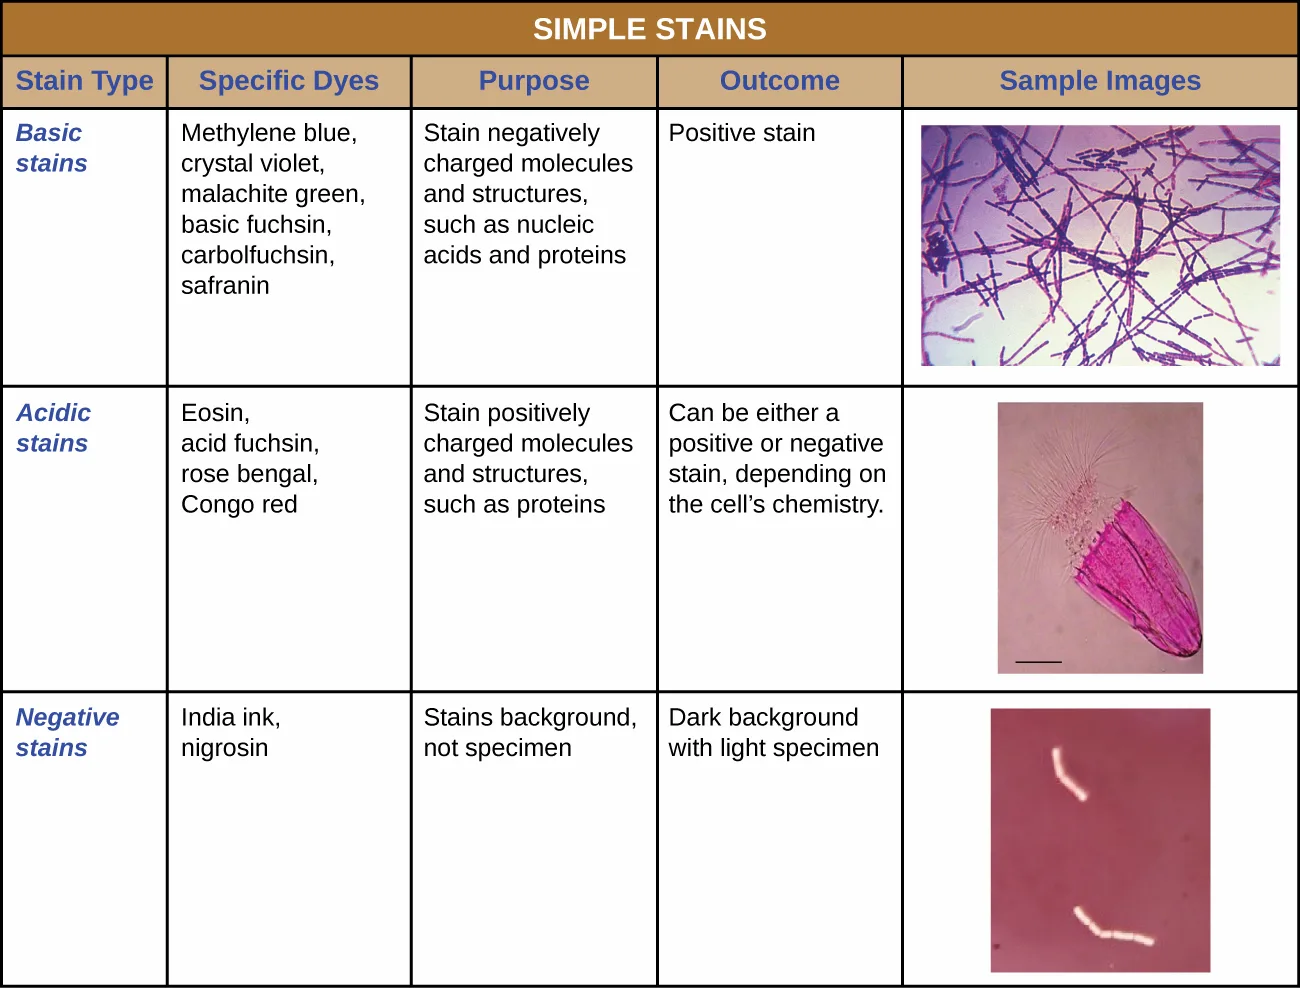
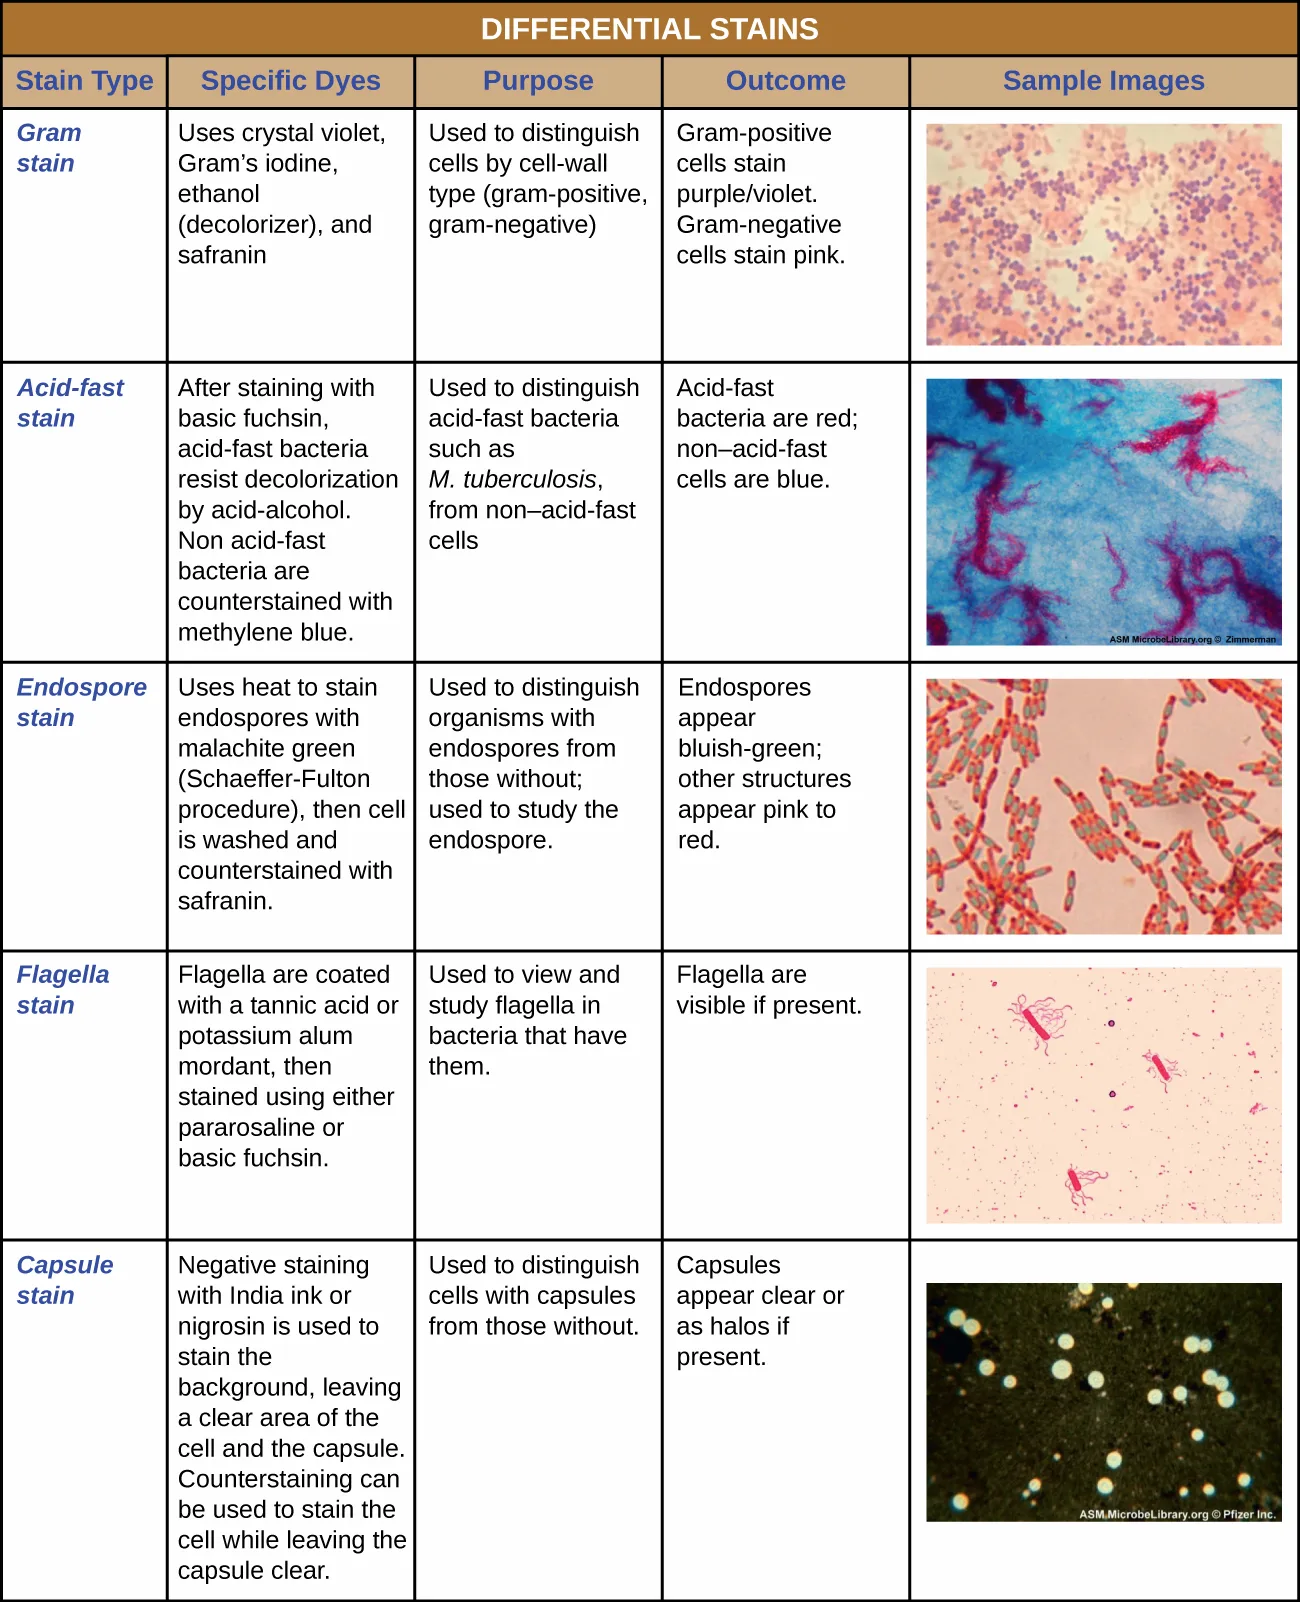
Some staining techniques involve the application of only one dye to the sample; others require more than one dye. In simple staining, a single dye is used to emphasize particular structures in the specimen. A simple stain will generally make all of the organisms in a sample appear to be the same color, even if the sample contains more than one type of organism. In contrast, differential staining distinguishes organisms based on their interactions with multiple stains. In other words, two organisms in a differentially stained sample may appear to be different colors. Differential staining techniques commonly used in clinical settings include Gram staining, acid-fast staining, endospore staining, flagella staining, and capsule staining. The table below provides more detail on these differential staining techniques.
Differential stains
| Stain type | Specific dyes | Purpose | Outcome |
|---|---|---|---|
| Gram stain | Crystal violet, Gram’s iodine, ethanol (decolorizer), safranin | Distinguish cells by cell-wall type (gram-positive, gram-negative) | Gram-positive cells stain purple/violet; gram-negative cells stain pink |
| Acid-fast stain | After staining with basic fuchsin, acid-fast bacteria resist decolorization by acid-alcohol; non–acid-fast bacteria are counterstained with methylene blue | Distinguish acid-fast bacteria, such as M. tuberculosis, from non–acid-fast cells | Acid-fast bacteria are red; non–acid-fast cells are blue |
| Endospore stain | Heat is used to stain endospores with malachite green (Schaeffer-Fulton procedure), then the cell is washed and counterstained with safranin | Distinguish organisms with endospores from those without; used to study the endospore | Endospores appear bluish-green; other structures appear pink to red |
| Flagella stain | Flagella are coated with a tannic acid or potassium alum mordant, then stained with pararosaniline or basic fuchsin | Used to view and study flagella in bacteria that have them | Flagella are visible if present |
| Capsule stain | Negative staining with India ink or nigrosin stains the background, leaving a clear area of the cell and the capsule; counterstaining can be used to stain the cell while leaving the capsule clear | Distinguish cells with capsules from those without | Capsules appear clear or as halos if present |
Check Your Understanding
Explain why it is important to fix a specimen before viewing it under a light microscope.
Think about what fixation does to the cells themselves, not just to the slide.What types of specimens should be chemically fixed as opposed to heat-fixed?
Think about which kind of specimen — cells in suspension or a solid tissue sample — heat could damage.Why might an acidic dye react differently with a given specimen than a basic dye? Sort each phrase under the type of simple stain it describes.
Basic
Acidic
Negative
Check Your Understanding
Explain the difference between a positive stain and a negative stain.
Show model answer
Did your answer mention:
Explain the difference between simple and differential staining by sorting each named technique under the category it belongs to.
Simple
Differential
Gram Staining
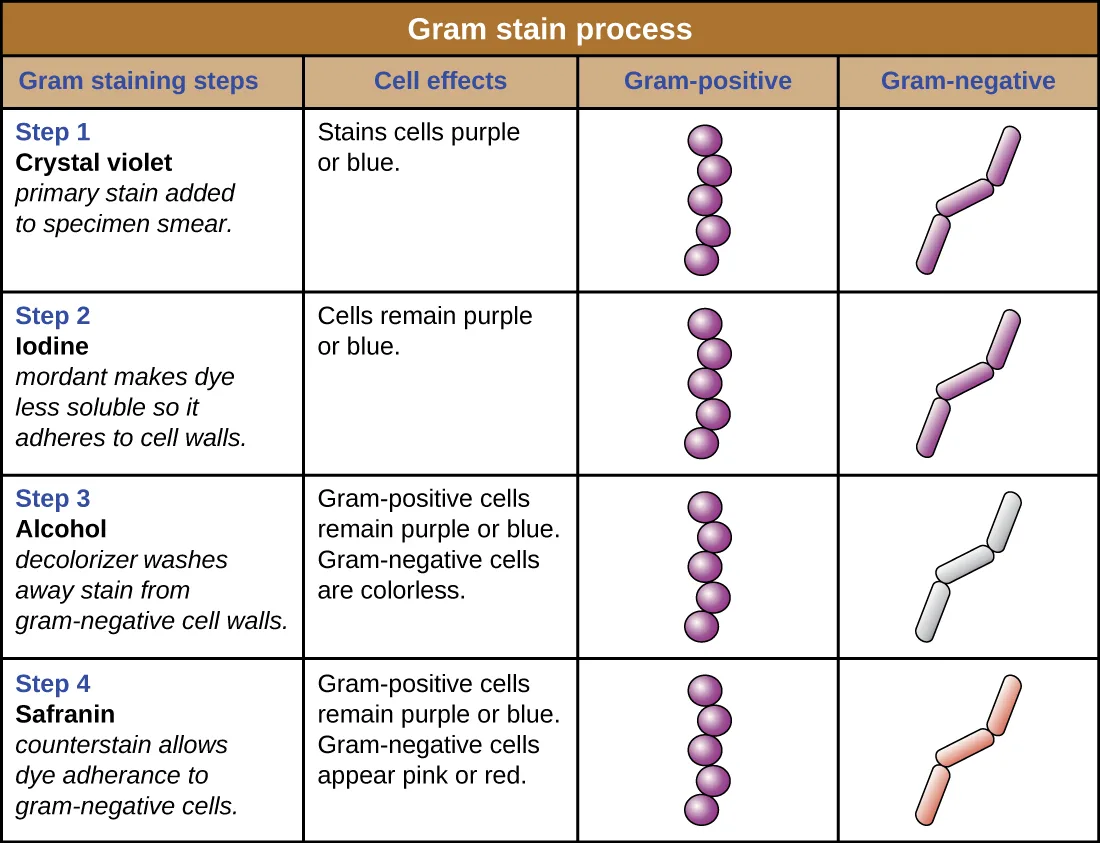
The Gram stain procedure is a differential staining procedure that involves multiple steps. It was developed by Danish microbiologist Hans Christian Gram in 1884 as an effective method to distinguish between bacteria with different types of cell walls, and even today it remains one of the most frequently used staining techniques. The steps of the Gram stain procedure are listed below and illustrated in the figure below.
- First, crystal violet, a primary stain, is applied to a heat-fixed smear, giving all of the cells a purple color.
- Next, Gram’s iodine, a mordant, is added. A mordant is a substance used to set or stabilize stains or dyes; in this case, Gram’s iodine acts like a trapping agent that complexes with the crystal violet, making the crystal violet–iodine complex clump and stay contained in thick layers of peptidoglycan in the cell walls.
- Next, a decolorizing agent is added, usually ethanol or an acetone/ethanol solution. Cells that have thick peptidoglycan layers in their cell walls are much less affected by the decolorizing agent; they generally retain the crystal violet dye and remain purple. However, the decolorizing agent more easily washes the dye out of cells with thinner peptidoglycan layers, making them again colorless.
- Finally, a secondary counterstain, usually safranin, is added. This stains the decolorized cells pink and is less noticeable in the cells that still contain the crystal violet dye.
Extended description
Step 1, crystal violet, the primary stain added to the specimen smear, stains cells purple or blue; the drawings show both the round gram-positive cells and the rod-shaped gram-negative cells purple. Step 2, iodine, the mordant, makes the dye less soluble so it adheres to the cell walls; the cells remain purple or blue in both drawings. Step 3, alcohol, the decolorizer, washes stain away from gram-negative cell walls; the gram-positive cells remain purple or blue while the gram-negative cells turn colorless in the drawing. Step 4, safranin, the counterstain, allows dye to adhere to the gram-negative cells; the gram-positive cells remain purple or blue while the gram-negative cells appear pink or red.
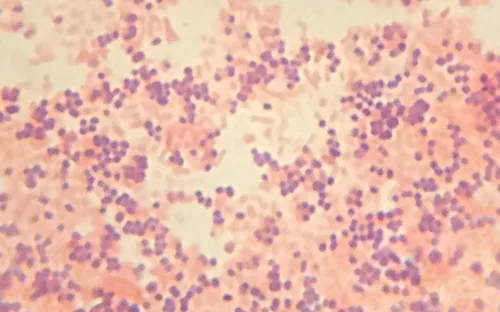
The purple, crystal-violet stained cells are referred to as gram-positive cells, while the red, safranin-dyed cells are gram-negative (shown in the micrograph below). However, there are several important considerations in interpreting the results of a Gram stain. First, older bacterial cells may have damage to their cell walls that causes them to appear gram-negative even if the species is gram-positive. Thus, it is best to use fresh bacterial cultures for Gram staining. Second, errors such as leaving the decolorizer on for too long can affect the results. For example, if the decolorizer is left on a slide of pure gram-positive bacterial cells for too long, some of the gram-positive cells will be decolorized and stained red with safranin, suggesting a mixed culture. Therefore, if a mixed culture of gram-positive and gram-negative cells is evaluated with the Gram stain and the decolorizer is left on too long, it will be difficult to accurately interpret the results.
Besides their differing interactions with dyes and decolorizing agents, the chemical differences between gram-positive and gram-negative cells have other implications with clinical relevance. For example, Gram staining can help clinicians classify bacterial pathogens in a sample into categories associated with specific properties. Gram-negative bacteria tend to be more resistant to certain antibiotics than gram-positive bacteria. We will discuss this and other applications of Gram staining in more detail in later chapters.
Check Your Understanding
Explain the role of Gram’s iodine in the Gram stain procedure.
Think about what a mordant does to the crystal violet dye once it is inside the cell wall.Explain the role of alcohol in the Gram stain procedure.
Think about how the thickness of a cell’s peptidoglycan layer affects how easily this step removes the crystal violet dye.What color are gram-positive and gram-negative cells, respectively, after the Gram stain procedure?
Think about which dye is retained by thick peptidoglycan layers and which dye colors the cells that lose it.Clinical Focus. Part 3
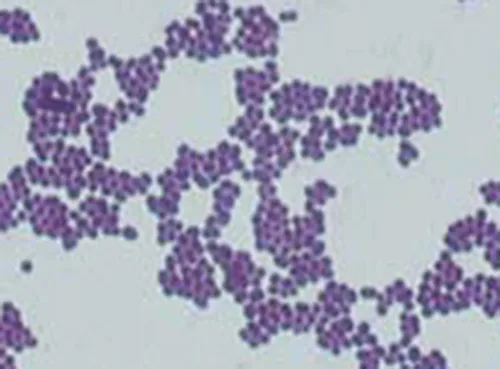
Viewing Cindy’s specimen under the darkfield microscope has provided the technician with some important clues about the identity of the microbe causing her infection. However, more information is needed to make a conclusive diagnosis. The technician decides to make a Gram stain of the specimen. This technique is commonly used as an early step in identifying pathogenic bacteria. After completing the Gram stain procedure, the technician views the slide under the brightfield microscope and sees purple, grape-like clusters of spherical cells (shown below).
- Are these bacteria gram-positive or gram-negative?
- What does this reveal about their cell walls?
The case began in The Properties of Light, continued in Instruments of Microscopy, and continues in the Resolution below.
Acid-Fast Stains
Acid-fast staining is another commonly used, differential staining technique that can be an important diagnostic tool. An acid-fast stain is able to differentiate two types of gram-positive cells: those that have waxy mycolic acids in their cell walls, and those that do not. Two different methods for acid-fast staining are the Ziehl-Neelsen technique and the Kinyoun technique. Both use carbolfuchsin as the primary stain. The waxy, acid-fast cells retain the carbolfuchsin even after a decolorizing agent (an acid-alcohol solution) is applied. A secondary counterstain, methylene blue, is then applied, which renders non–acid-fast cells blue.
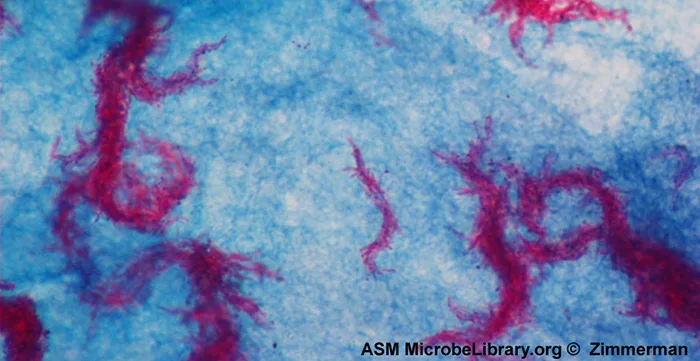
The fundamental difference between the two carbolfuchsin-based methods is whether heat is used during the primary staining process. The Ziehl-Neelsen method uses heat to infuse the carbolfuchsin into the acid-fast cells, whereas the Kinyoun method does not use heat. Both techniques are important diagnostic tools because a number of specific diseases are caused by acid-fast bacteria (AFB). If AFB are present in a tissue sample, their red or pink color can be seen clearly against the blue background of the surrounding tissue cells (shown below).
Check Your Understanding
Why are acid-fast stains useful?
Show model answer
Did your answer mention:
Micro Connection. Using Microscopy to Diagnose Tuberculosis
Mycobacterium tuberculosis, the bacterium that causes tuberculosis, can be detected in specimens based on the presence of acid-fast bacilli. Tuberculosis infected immense portions of the global population throughout the 19th and 20th centuries, and much of the work of early microbiologists and other researchers was focused on the disease. Ruth Ella Moore, a prominent researcher who is known for work on blood typing, dental cavities, and gut microbiome, as well as for being the first Black woman to earn a natural science Ph.D., wrote her dissertation on new methods of isolating M. tuberculosis in order to better study it and develop a cure. These isolates would be critical in diagnosis and other medical procedures as well.
Often, a smear is prepared from a sample of the patient’s sputum and then stained using the Ziehl-Neelsen technique (shown below). If acid-fast bacteria are confirmed, they are generally cultured to make a positive identification. Variations of this approach can be used as a first step in determining whether M. tuberculosis or other acid-fast bacteria are present, though samples from elsewhere in the body (such as urine) may contain other Mycobacterium species.
An alternative approach for determining the presence of M. tuberculosis is immunofluorescence. In this technique, fluorochrome-labeled antibodies bind to M. tuberculosis, if present. Antibody-specific fluorescent dyes can be used to view the mycobacteria with a fluorescence microscope.
Capsule Staining
Certain bacteria and yeasts have a protective outer structure called a capsule. Since the presence of a capsule is directly related to a microbe’s virulence (its ability to cause disease), the ability to determine whether cells in a sample have capsules is an important diagnostic tool. Capsules do not absorb most basic dyes; therefore, a negative staining technique (staining around the cells) is typically used for capsule staining. The dye stains the background but does not penetrate the capsules, which appear like halos around the borders of the cell. The specimen does not need to be heat-fixed prior to negative staining.
One common negative staining technique for identifying encapsulated yeast and bacteria is to add a few drops of India ink or nigrosin to a specimen. Other capsular stains can also be used to negatively stain encapsulated cells (shown below). Alternatively, positive and negative staining techniques can be combined to visualize capsules: the positive stain colors the body of the cell, and the negative stain colors the background but not the capsule, leaving a halo around each cell.
Check Your Understanding
How does negative staining help us visualize capsules?
Think about which part of the specimen the dye actually colors when the capsule itself resists most basic dyes.Endospore Staining
Endospores are structures produced within certain bacterial cells that allow them to survive harsh conditions. Gram staining alone cannot be used to visualize endospores, which appear clear when Gram-stained cells are viewed. Endospore staining uses two stains to differentiate endospores from the rest of the cell. The Schaeffer-Fulton method (the most commonly used endospore-staining technique) uses heat to push the primary stain (malachite green) into the endospore. Washing with water decolorizes the cell, but the endospore retains the green stain. The cell is then counterstained pink with safranin. The resulting image reveals the shape and location of endospores, if they are present. The green endospores will appear either within the pink vegetative cells or as separate from the pink cells altogether. If no endospores are present, then only the pink vegetative cells will be visible (shown below).
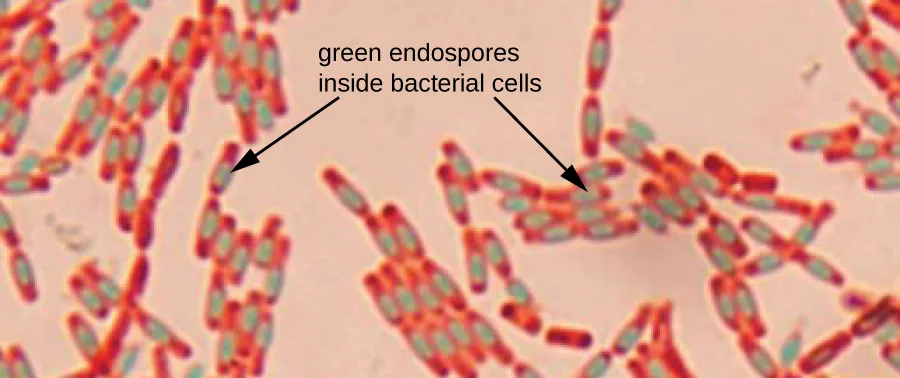
Endospore-staining techniques are important for identifying Bacillus, Clostridium, and Clostridioides, three genera of endospore-producing bacteria that contain clinically significant species. Among others, B. anthracis (which causes anthrax) has been of particular interest because of concern that its spores could be used as a bioterrorism agent. Clostridioides difficile is a particularly important species responsible for the typically hospital-acquired infection known as “C. diff.”
Check Your Understanding
Is endospore staining an example of positive, negative, or differential staining?
Think back to how many different stains this technique applies, and to the earlier sentence that named it among the differential techniques.Flagella Staining
Flagella (singular: flagellum) are tail-like cellular structures used for locomotion by some bacteria, archaea, and eukaryotes. Because they are so thin, flagella typically cannot be seen under a light microscope without a specialized flagella staining technique. Flagella staining thickens the flagella by first applying mordant (generally tannic acid, but sometimes potassium alum), which coats the flagella; then the specimen is stained with pararosaniline (most commonly) or basic fuchsin (shown below).
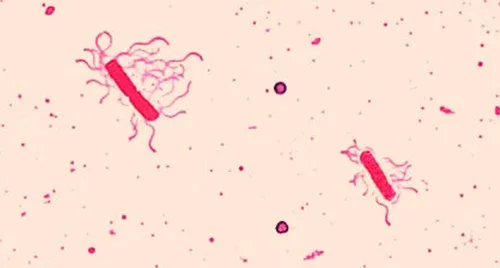
Though flagella staining is uncommon in clinical settings, the technique is commonly used by microbiologists, since the location and number of flagella can be useful in classifying and identifying bacteria in a sample. When using this technique, it is important to handle the specimen with great care; flagella are delicate structures that can easily be damaged or pulled off, compromising attempts to accurately locate and count the number of flagella.
Preparing Specimens for Electron Microscopy
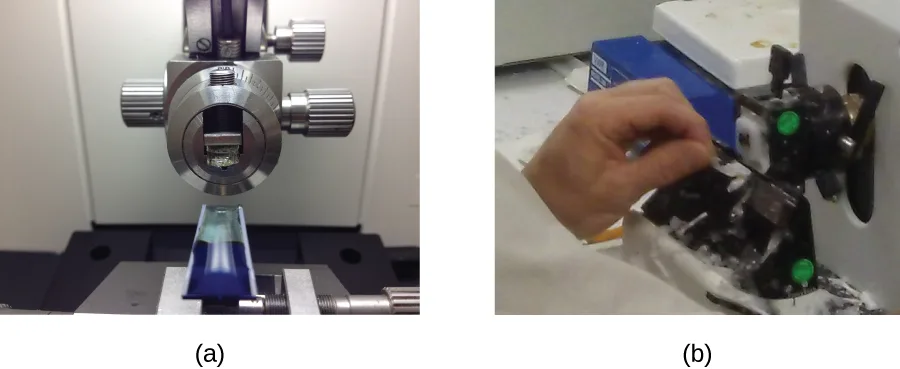
Samples to be analyzed using a TEM must have very thin sections. But cells are too soft to cut thinly, even with diamond knives. To cut cells without damage, the cells must be embedded in plastic resin and then dehydrated through a series of soaks in ethanol solutions (50%, 60%, 70%, and so on). The ethanol replaces the water in the cells, and the resin dissolves in ethanol and enters the cell, where it solidifies. Next, thin sections are cut using a specialized device called an ultramicrotome (shown below). Finally, samples are fixed to fine copper wire or carbon-fiber grids and stained—not with colored dyes, but with substances like uranyl acetate or osmium tetroxide, which contain electron-dense heavy metal atoms.
When samples are prepared for viewing using an SEM, they must also be dehydrated using an ethanol series. However, they must be even drier than is necessary for a TEM. Critical point drying with inert liquid carbon dioxide under pressure is used to displace the water from the specimen. After drying, the specimens are sputter-coated with metal by knocking atoms off of a palladium target, with energetic particles. Sputter-coating prevents specimens from becoming charged by the SEM’s electron beam.
Check Your Understanding
Why is it important to dehydrate cells before examining them under an electron microscope?
Show model answer
Did your answer mention:
Name the device that is used to create thin sections of specimens for electron microscopy.
This device’s name combines a prefix meaning very small with the word for an instrument that cuts thin slices.Micro Connection. Using Microscopy to Diagnose Syphilis
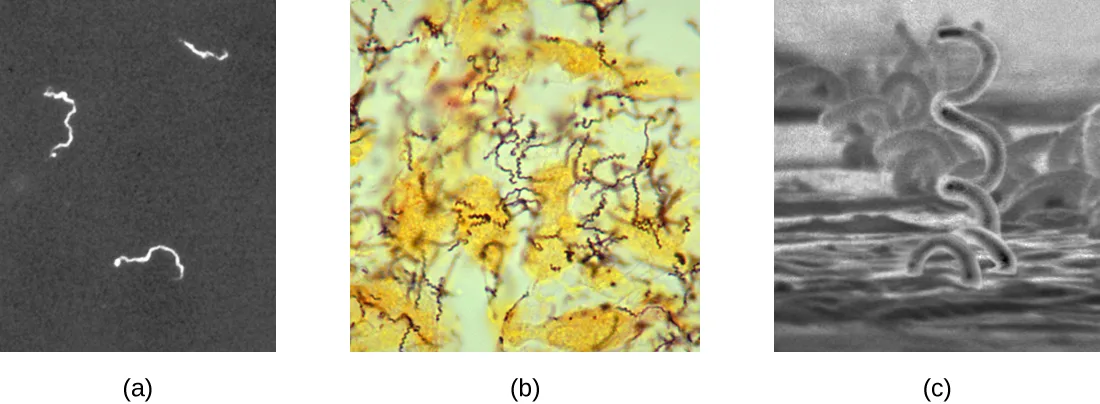
The causative agent of syphilis is Treponema pallidum, a flexible, spiral cell (spirochete) that can be very thin (<0.15 µm) and match the refractive index of the medium, making it difficult to view using brightfield microscopy. Additionally, this species has not been successfully cultured in the laboratory on an artificial medium; therefore, diagnosis depends upon successful identification using microscopic techniques and serology (analysis of body fluids, often looking for antibodies to a pathogen). Since fixation and staining would kill the cells, darkfield microscopy is typically used for observing live specimens and viewing their movements. However, other approaches can also be used. For example, the cells can be thickened with silver particles (in tissue sections) and observed using a light microscope. It is also possible to use fluorescence or electron microscopy to view Treponema (shown below).
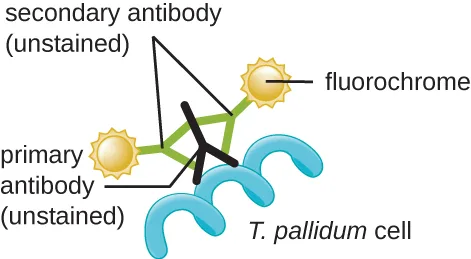
In clinical settings, indirect immunofluorescence is often used to identify Treponema. A primary, unstained antibody attaches directly to the pathogen surface, and secondary antibodies “tagged” with a fluorescent stain attach to the primary antibody. Multiple secondary antibodies can attach to each primary antibody, amplifying the amount of stain attached to each Treponema cell, making them easier to spot (shown below).
Extended description
Reading the diagram: the T. pallidum cell (blue) carries an unstained primary antibody (black, Y-shaped) bound to its surface. Two unstained secondary antibodies (green, Y-shaped), each carrying a yellow starburst fluorochrome, bind to the primary antibody, so several fluorescent tags cluster at the one site where the primary antibody attached.
Preparation and Staining for Other Microscopes
Samples for fluorescence and confocal microscopy are prepared similarly to samples for light microscopy, except that the dyes are fluorochromes. Stains are often diluted in liquid before applying to the slide. Some dyes attach to an antibody to stain specific proteins on specific types of cells (immunofluorescence); others may attach to DNA molecules in a process called fluorescence in situ hybridization (FISH), causing cells to be stained based on whether they have a specific DNA sequence.
Sample preparation for two-photon microscopy is similar to fluorescence microscopy, except for the use of infrared dyes. Specimens for STM need to be on a very clean and atomically smooth surface. They are often mica coated with Au(111). Toluene vapor is a common fixative.
Check Your Understanding
What is the main difference between preparing a sample for fluorescence microscopy versus light microscopy?
Think about what kind of dye replaces an ordinary stain for this microscopy type.Link to Learning
Cornell University’s and St. Joseph’s University’s Case Studies in Microscopy offers a series of clinical problems based on real-life events. Each case study walks you through a clinical problem using appropriate techniques in microscopy at each step.
Clinical Focus. Resolution
From the results of the Gram stain, the technician now knows that Cindy’s infection is caused by spherical, gram-positive bacteria that form grape-like clusters, which is typical of staphylococcal bacteria. After some additional testing, the technician determines that these bacteria are the medically important species known as Staphylococcus aureus, a common culprit in wound infections. Because some strains of S. aureus are resistant to many antibiotics, skin infections may spread to other areas of the body and become serious, sometimes even resulting in amputations or death if the correct antibiotics are not used.
After testing several antibiotics, the lab is able to identify one that is effective against this particular strain of S. aureus. Cindy’s doctor quickly prescribes the medication and emphasizes the importance of taking the entire course of antibiotics, even if the infection appears to clear up before the last scheduled dose. This reduces the risk that any especially resistant bacteria could survive, causing a second infection or spreading to another person.
This resolves the case that began in The Properties of Light.
Eye on Ethics. Microscopy and Antibiotic Resistance
As the use of antibiotics has proliferated in medicine, as well as agriculture, microbes have evolved to become more resistant. Strains of bacteria such as methicillin-resistant S. aureus (MRSA), which has developed a high level of resistance to many antibiotics, are an increasingly worrying problem, so much so that research is underway to develop new and more diversified antibiotics.
Fluorescence microscopy can be useful in testing the effectiveness of new antibiotics against resistant strains like MRSA. In a test of one new antibiotic derived from a marine bacterium, MC21-A (bromophene), researchers used the fluorescent dye SYTOX Green to stain samples of MRSA. SYTOX Green is often used to distinguish dead cells from living cells, with fluorescence microscopy. Live cells will not absorb the dye, but cells killed by an antibiotic will absorb the dye, since the antibiotic has damaged the bacterial cell membrane. In this particular case, MRSA bacteria that had been exposed to MC21-A did, indeed, appear green under the fluorescence microscope, leading researchers to conclude that it is an effective antibiotic against MRSA.
Of course, some argue that developing new antibiotics will only lead to even more antibiotic-resistant microbes, so-called superbugs that could spawn epidemics before new treatments can be developed. For this reason, many health professionals are beginning to exercise more discretion in prescribing antibiotics. Whereas antibiotics were once routinely prescribed for common illnesses without a definite diagnosis, doctors and hospitals are much more likely to conduct additional testing to determine whether an antibiotic is necessary and appropriate before prescribing.
A sick patient might reasonably object to this stingy approach to prescribing antibiotics. To the patient who simply wants to feel better as quickly as possible, the potential benefits of taking an antibiotic may seem to outweigh any immediate health risks that might occur if the antibiotic is ineffective. But at what point do the risks of widespread antibiotic use supersede the desire to use them in individual cases?
Summary
- Samples must be properly prepared for microscopy. This may involve staining, fixation, and/or cutting thin sections.
- A variety of staining techniques can be used with light microscopy, including Gram staining, acid-fast staining, capsule staining, endospore staining, and flagella staining.
- Samples for TEM require very thin sections, whereas samples for SEM require sputter-coating.
- Preparation for fluorescence microscopy is similar to that for light microscopy, except that fluorochromes are used.
Key terms
- wet mount — a slide preparation technique in which a specimen is placed on the slide in a drop of liquid.
- fixation — the process by which cells are killed and attached to a slide.
- smear — a thin layer of a specimen on a slide.
- staining — the addition of stains or dyes to a microscopic specimen for the purpose of enhancing contrast.
- basic dye — a chromophore with a positive charge that attaches to negatively charged structures.
- acidic dye — a chromophore with a negative charge that attaches to positively charged structures.
- positive stain — a stain that colors the structure of interest.
- negative stain — a stain that produces color around the structure of interest while not coloring the structure itself.
- simple staining — a staining technique that uses a single dye.
- differential staining — staining that uses multiple dyes to differentiate between structures or organisms.
- Gram stain procedure — a differential staining technique that distinguishes bacteria based upon their cell wall structure.
- primary stain — refers, in differential staining techniques, to the first dye added to the specimen.
- mordant — a chemical added to a specimen that sets a stain.
- decolorizing agent — a substance that removes a stain, usually from some parts of the specimen.
- counterstain — a secondary stain that adds contrasting color to cells from which the primary stain has been washed out by a decolorizing agent.
- acid-fast stain — a stain that differentiates cells that have waxy mycolic acids in their gram-positive cell walls.
- Ziehl-Neelsen technique — a method of acid-fast staining that uses heat to infuse the primary stain, carbolfuchsin, into acid-fast cells.
- Kinyoun technique — a method of acid-fast staining that does not use heat to infuse the primary stain, carbolfuchsin, into acid-fast cells.
- capsule staining — a negative staining technique that stains around a bacterial capsule while leaving the capsule clear.
- endospore staining — a differential staining technique that uses two stains to make bacterial endospores appear distinct from the rest of the cell.
- flagella staining — a staining protocol that uses a mordant to coat the flagella with stain until they are thick enough to be seen.
- thin sections — thin slices of tissue for examination under a TEM.
- ultramicrotome — a device that cuts thin sections for electron microscopy.
Practice
Differentiate between simple and differential stains
Which of the following is a differential staining technique?
Three of these options are ways to prepare a specimen for viewing, not stains at all; the fourth uses more than one dye to distinguish bacteria by their cell walls.________ staining uses a single dye to emphasize particular structures in a specimen, so it generally makes every organism in a sample appear to be the same color.
This is the opposite of the staining approach that uses more than one dye and can make different organisms appear as different colors.If a mixed sample containing two different species of bacteria is stained with a simple stain, would the two species look different from each other afterward? Explain your answer.
Think about how many dyes a simple stain applies, and whether that lets different organisms end up different colors.Describe the unique features of commonly used stains
What is one difference between specimen preparation for a transmission electron microscope (TEM) and preparation for a scanning electron microscope (SEM)?
Both types of specimens must be dehydrated with an ethanol series; only one of them is coated with metal afterward.A chemical added to a specimen to set or stabilize a stain or dye is called a ________.
This chemical acts on some stains by trapping the primary dye inside thick layers of a cell wall’s peptidoglycan.Why doesn’t a specimen need to be heat-fixed before capsule staining?
Show model answer
Did your answer mention:
Explain the procedures and name clinical applications for Gram, endospore, acid-fast, negative capsule, and flagella staining
What mordant is used in Gram staining?
This substance makes the crystal violet dye clump and stay trapped within thick peptidoglycan layers in the cell wall.Ziehl-Neelsen staining, a type of ________ staining, is diagnostic for Mycobacterium tuberculosis.
Both Ziehl-Neelsen and Kinyoun are variants of the same staining approach; one uses heat to help the primary stain penetrate the cell wall.The ________ is used to differentiate bacterial cells based on the components of their cell walls.
This procedure applies crystal violet, then a mordant, then a decolorizing agent, and finally a safranin counterstain.How could you identify whether a particular bacterial sample contained specimens with mycolic acid-rich cell walls?
Think about which staining technique distinguishes cells with waxy cell-wall components from those without, and what color the two groups end up after its counterstain.You use the Gram staining procedure to stain an L-form bacterium (a bacterium that lacks a cell wall). What color will the bacterium be after the staining procedure is finished?
Show model answer
Did your answer mention:
This section is adapted from Microbiology, Section 2.4: Staining Microscopic Specimens by Nina Parker, Mark Schneegurt, Anh-Hue Thi Tu, Philip Lister, Brian M. Forster, and OpenStax, © OpenStax, licensed under CC BY-NC-SA 4.0. Access the original for free at openstax.org. Changes: figures re-encoded as WebP, with kind="photo" set explicitly on twelve photographic figures and kind="diagram" on the two drawn/labeled figures (the Gram stain process table and the indirect-immunofluorescence schematic), overriding the media manifest’s JPEG-based guess; alts rewritten for all fourteen figures to describe what is visibly drawn or photographed, since this chapter’s source alts contain defects (the Gram-stain-process alt misspells “purple” as “pruple,” and the two stain-table alts misspell “fuchsin” as “fuschsin,” “India ink” as “india in k,” and contain a 1,000-character run-on of cells) rather than reused; a longdesc added for the Gram stain process figure (required) and the indirect-immunofluorescence diagram, walking each in reading order; the two summary tables printed as images in the source (Simple Stains, Differential Stains) are transcribed as Markdown tables from the image, checked against the printed page, because the source alt for both misspells several dye names (the Differential Stains image itself prints “pararosaline” in its flagella-stain row; the transcribed table prints pararosaniline, the spelling this section’s own text uses, and the image’s spelling is reported as a source defect) — the source images are kept immediately after their tables for their sample micrographs only, with alts limited to the micrograph column and not re-transcribing the table cells; both tables are placed at the point in the text where the module’s own sentence introduces them (“provides more detail” / “provides more detail on these differential staining techniques”), not at their later position in the source’s print layout, where they are typeset at the end of the Flagella Staining section for page-fit reasons that do not apply to a continuously scrolling page; feature boxes rendered as callouts; of the fourteen Check Your Understanding bullets, eleven are now graded — eight multiplechoice, two sortbins (one built from the Simple Stains table, one classifying named techniques as simple or differential), and one textin — from this section’s own sentences and tables (11 Check Your Understanding questions graded from the module’s own sentences or tables rather than answered in prose; the source prints no key for them), and three (why acid-fast stains are useful; why cells must be dehydrated before electron microscopy; and the difference between a positive and a negative stain) remain body self-checks with model answers and rubrics assembled from this section’s own preceding text, because each combines more than one module sentence rather than resting on a single one; the source’s single five-bullet box split into two labeled “Check Your Understanding” runs of three and two so no more than three self-checks run back to back without intervening prose or a figure; a second sortbins for the Differential Stains table was considered and skipped, since four of its five rows’ distinguishing facts (Gram stain’s mordant/decolorizer/counterstain roles and color outcome; acid-fast stain’s mycolic-acid identification; endospore staining’s classification; capsule staining’s background-only mechanism) are already asked by converted items elsewhere on the page, leaving only the flagella-stain row untested — not enough for a second 4-item sortbins without repeating a fact; the Clinical Focus box’s Part 3 now names all three earlier parts of the case — it began in Section 2.1, continued in Section 2.3, and continues in the Resolution below — replacing the source’s “Jump to the next / Go back to the previous Clinical Focus box” links, and the Resolution names where the case began, since it is not accurate to call Part 2 “where the case began” once a case runs across three sections; the Link to Learning sentence’s title, which the source printed twice in a row (once as plain text, once repeated as the link text), is printed once as the Markdown link text; the end-of-section Multiple Choice and Fill in the Blank questions and the unkeyed Short Answer and Critical Thinking questions are adapted into the closing interactive Practice block, sorted under the objective each supports; of the two, the Short Answer question (identifying mycolic-acid-rich cell walls) is now a multiplechoice graded from this section’s own sentence, among the differential-stain names this section’s tables print (1 of the source’s unkeyed Short Answer questions is graded from the module’s own sentence rather than answered in prose; the source prints no key for it), and the model answer for the remaining Critical Thinking question is written from this section’s own text, because the source prints no answer key for it; five filler items (one multiple choice and one self-check for the first objective, one text-recall and one self-check for the second, both from this section’s own body sentences) fill out the first two objective groups, which the source’s own exercise set does not reach on its own — the first objective’s filler self-check (whether two species look different under a simple stain) is now a multiplechoice, and the second objective’s filler self-check (why capsule staining needs no heat-fixing) remains a self-check, because the module states only the one reason and no alternative module-printed mechanism exists to build defensible wrong options from; key terms compiled from the module’s twenty-three defined terms and the book’s Glossary appendix (all twenty-three taken from the glossary; none from a defining sentence); the Treponema pallidum figure’s caption is printed verbatim, including the source’s “used to visualized” (reported as a source defect rather than corrected, because the caption rule keeps the source’s wording); the µm figure in the syphilis Micro Connection is set with the micro sign (µ), not the Greek letter mu, per the book’s notation rule; cross-references to Sections 2.1 and 2.3 rendered as absolute links, since both pages exist.